Why This Small Bathroom Upgrade Matters Now
Let’s be real—a small bathroom upgrade doesn’t usually sit at the top of anyone’s dream project list. But if you’ve got an hour or two and the right tools, you can do more than just “freshen up” that cave-like guest bath—you can actually make it feel bigger and brighter without ripping out tile or calling in backup. This is one of those rare upgrades where the effort-to-impact ratio is wildly in your favor.
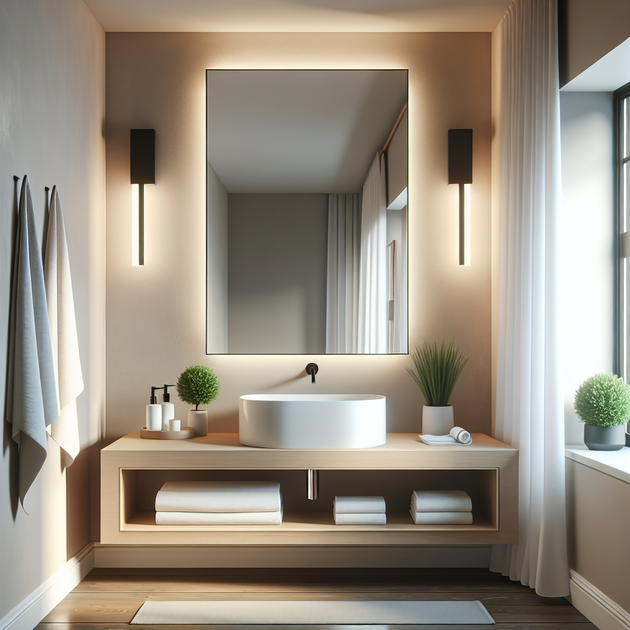
What Changed With This Small Bathroom Upgrade
Recently, I stumbled across someone’s quick win on their own guest bath. The space felt dark and tight, thanks to an old postage-stamp mirror from the ‘90s and one of those Hollywood strip lights that somehow manages to highlight every flaw while making the room feel smaller. Instead of going full demo mode, they swapped the tiny mirror for a 36-inch LED model (think: built-in soft glow) and replaced the exposed-bulb fixture with a simple matte-black vanity light.
No drywall dust. No fights with grout or pipes. The whole thing took two hours—including wiring—because they reused what was already there. The result? Even the family’s toughest critic (their teenage daughter) was impressed. And get this—they’d saved up for a big renovation but decided this did the trick so well they’re shelving those plans for now.
How This Small Bathroom Upgrade Works: Step-By-Step
Ready to banish your own builder-grade gloom? Here’s how to get it done—no vague advice, just straight steps:
- Measure first. Grab a tape measure and check wall width above your sink. Make sure your new mirror (e.g., 36″) fits with at least 2″ clearance on each side.
- Power down. At your circuit breaker panel, flip the switch labeled “Bathroom” (or test with a voltage tester at the fixture just to be sure).
- Remove old hardware. Unscrew bulbs and mounting screws from your old fixture (“Vanity Light”); gently pry off that tiny builder-grade mirror.
- Install the new light. Attach bracket (from box) to wall electrical box; connect black to black/white to white wires using included wire nuts; tuck wires back in; screw fixture base on; add bulbs if not integrated.
- Mount LED mirror. Use provided anchors/screws for drywall or hit studs if possible (“Mirror Hanging Template” often included). If mirror is plug-in only: run cord neatly along trim; if hardwired, repeat wiring steps from above.
- Power up + sanity check. Flip breaker back ON; verify both light and LED strip work; check for even mounting (level bubble should center).
A Realistic Scenario: Family Approval Meter
Let me paint you the scene—a cramped guest bath where every morning feels like prepping in an airport stall. You swap in that oversized LED mirror and new black bar light after brunch on Saturday. Suddenly the walls seem to move outward and shadows disappear. Your partner immediately comments on the brightness (“Wow—this actually feels bigger”). Even your teenager gives a non-ironic nod of approval before disappearing down the hall.
You step back and realize—without gutting anything or taking out a loan—you’ve dramatically changed how everyone feels about this room.
The Nuance No One Tells You About Small Bathroom Upgrades
Here’s something plenty of before-and-after posts skip over: even with “universal” replacement parts, walls aren’t always square and junction boxes might sit off-center—or worse, there are extra holes left behind by old fixtures.
If you find extra holes exposed after removing your old mirror/light:
- Spackle & Sand: Patch with lightweight spackle; sand flush after it dries (20–30 minutes).
- Paint Touch-Up: Keep a sample jar of wall paint handy for quick roll-on fixes before mounting anything new.
Another subtle catch—some LED mirrors require hardwiring (not plug-in), which means you’ll need basic wiring skills or an electrician friend on speed dial if you’re not comfortable.
Also consider this contrarian angle: Sometimes big transformations don’t need demo days or spending thousands. According to data from Houzz’s survey on bathroom remodels, nearly half of homeowners regret overspending on finishes when lighting or layout changes alone would have delivered most of the satisfaction.
Quick Wins Box: Do-This-Then-That Checklist
- Photograph your current setup for reference—then use these photos as “before” proof later.
- Order a larger LED mirror online (look for 36-inch width with integrated lighting).
- Pick up a vanity light bar in matte black or brushed nickel—avoid exposed bulbs for softer effect.
- If holes show after demoing old gear, patch with spackle before moving forward.
- Add dimmable bulbs or choose an LED mirror with adjustable brightness for more control.
The Reflective Close
So next time you’re tempted to go nuclear on your tired bath—pause and ask yourself if one targeted swap could deliver more than you expect. When was the last time you tried solving a “big” problem with just one or two deliberate moves?
By Blog-Tec Staff — edited for clarity.
If you want more detail on choosing mirrors or lights that fit your wiring setup, check out this guide from Family Handyman. For design inspiration, browse real-world projects on Houzz.
Leave a Reply