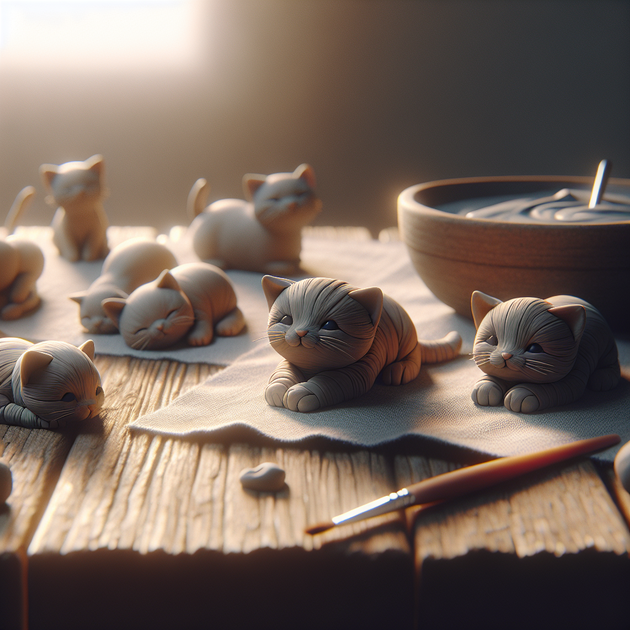
Miniature sculpting is having a quiet moment online, and these tiny clay cats prove why. You can go from a lump of air dry clay to a lifelike kitten in under an hour—no kiln, no specialized tools. It’s fast craft therapy for anyone who wants to make something tangible after a day of screens.
Why small-scale sculpting matters now
There’s been a shift in hobby circles lately. Makers are trading big 3D printers and resin gear for low-cost materials like air dry clay. It dries on its own, doesn’t need ventilation, and still lets you sand or carve fine details. The Reddit post by user “cordaites” caught attention because the results looked both imperfect and personal—the kind of handmade charm algorithms can’t fake.
The surprise here isn’t just the cuteness; it’s the precision you can get without a studio setup. Air dry clays such as DAS or Crayola’s white modeling compound are formulated to harden evenly at room temperature. Add acrylic paint and gloss varnish, and you’ve got color depth similar to glazed ceramics.
How to build your own tiny clay cats
You can start with what’s on your desk right now—seriously. Follow this focused micro-checklist:
- Step 1: Open one palm-sized block of air dry clay. Knead it until pliable; if cracks show, mist it lightly with water.
- Step 2: Roll a sphere (head) and an oval (body). Press together gently; blend the seam using your thumb.
- Step 3: Pinch out ears from the head shape—avoid adding extra bits; they’ll fall off when drying.
- Step 4: Use a toothpick or stylus to carve facial lines. Make shallow eye sockets; don’t poke through.
- Step 5: Let it dry on parchment paper for 24 hours. Flip halfway through so the underside cures evenly.
Once cured, grab fine sandpaper (400–600 grit) to smooth bumps. Then move to painting:
– Apply a base coat of matte white acrylic.
– Add thin color layers for fur patterns—orange stripes, gray patches.
– Seal with gloss varnish for that porcelain finish.
If you prefer durability or want more vibrant colors, switch to polymer clay next time. It bakes in a household oven (usually 130°C / 265°F). Just remember to dedicate one baking tray to crafts only—never reuse it for food.
Tiny clay cats meet real-life inspiration
The original Reddit artist shaped two kittens modeled after their own pets—a gray one and an orange one—and you can feel that connection in the results. There’s something about translating personality into form that photos can’t capture. You start noticing small traits: ear tilt, paw angle, tail curl direction.
I tried the same method last weekend using reference photos of my neighbor’s cat lounging by the router (she likes the warmth). My first attempt slumped forward like wet bread dough; I had used too much water during smoothing. Second try held its shape perfectly after I switched to slightly thicker limbs and less moisture. Lesson logged.
The contrarian insight: imperfection sells realism
Most tutorials obsess over symmetry—measurements here, templates there—but real animals aren’t symmetrical. A cat’s left ear bends differently from its right after years of stretching toward fridge sounds. If you intentionally make one side rougher or one paw shorter, the figure feels more alive.
This runs against traditional model-making advice but aligns with findings from visual-perception studies published by Elsevier journals. Slight asymmetry signals authenticity because our brains link irregularity with organic life forms.
Common pitfalls when crafting tiny clay cats
The main gotcha is cracking during drying. Air dry clays lose moisture unevenly if exposed directly to sunlight or heat vents. To prevent this:
– Dry pieces on a breathable surface like cardboard.
– Avoid sealing them until fully hardened inside (you can test by tapping—the sound shifts from dull to crisp).
Another issue is paint beading up on slick surfaces. Always sand lightly before priming; acrylics need grip. If varnish turns cloudy afterward, humidity is likely high—rerun varnishing in drier conditions or use polyurethane spray rated for indoor humidity control.
Quick wins for better mini sculptures
- Knead new packs of air dry clay even if labeled “ready to use”—it warms up elasticity fast.
- Keep old toothbrushes nearby; they’re perfect texture tools for fur patterns.
- Sculpt multiple heads separately before attaching—easier quality control.
- Add weighted bases (tiny steel washers) inside figures so they stand upright while drying.
- Photograph under diffuse light; gloss finishes glare easily under direct lamps.
A material choice worth rethinking
A lot of beginners jump straight into polymer clays like Sculpey because they bake hard and don’t crack as easily. But air dry varieties teach restraint—you learn water control, layering patience, sanding finesse. Each medium builds different hand memory skills useful later when moving into digital sculpting tablets or resin casting workflows.
An overlooked benefit is environmental: air dry clays require no energy-hungry curing process. For casual makers aiming for low carbon footprints, that matters more than shaving five minutes off drying time.
The maker mindset behind every cat
The artist behind these kittens mentioned plans to try polymer next round—a sensible upgrade path once confidence builds. You experiment with body posture or accessories like collars molded separately then attached post-bake using epoxy adhesive such as E6000 (ventilate properly).
This iterative approach mirrors prototyping cycles in engineering teams: quick model → feedback → refine → finalize texture map (in this case, fur pattern). Crafting small also trains observation speed—you can finish several versions in one afternoon rather than waiting days between firings.
The broader trend of tactile hobbies
Makers across forums note that simple projects outperform complex ones when measured by completion rate. People want quick wins they can hold—proof that time spent away from keyboards yields something physical. Air dry clay sits perfectly at that intersection between accessibility and satisfaction.
If you scroll through hashtags like #airdryclaycat or #miniaturesculpture on Instagram, you’ll see thousands of hobbyists sharing similar experiments—each piece slightly wobbly yet full of character. That’s modern craftsmanship distilled: speed meets soul.
The trade-offs no one mentions
You’ll eventually hit limits with surface detail—air dry clays don’t tolerate razor-thin edges well; ears may chip if too sharp. Solution: exaggerate proportions slightly at sculpt stage so post-drying shrinkage keeps things stable.
If figures still topple easily, embed thin wire armatures before shaping bodies—any cheap florist wire works fine—and cover completely so rust spots don’t bleed through paint later on.
Tiny clay cats as digital detox tools
Crafters often report calm focus during shaping sessions comparable to short meditation intervals documented by Psychology Today. There’s steady breathing built into rolling spheres and carving whiskers—it slows mental tempo naturally without any app reminders buzzing nearby.
If stress spikes midweek, spending thirty minutes molding something imperfect might reset more effectively than doomscrolling another thread about productivity hacks.
Your next hour challenge
You could actually start now: grab leftover modeling compound from a kid’s art kit or supermarket aisle craft pack under five dollars. Form two lumps into silhouettes resembling cats facing opposite directions; name them whatever pops up first in your head (mine were “Router” and “Packet”). Paint tomorrow evening once they’re bone-dry—that rhythm keeps momentum going without burnout.
A closing thought
The beauty of these tiny sculptures lies not just in miniature realism but in process awareness—you notice how small choices ripple through texture and balance. Every curve becomes intentional rather than automatic copy-paste motion from digital life.
So maybe this weekend, instead of another algorithmic scroll session, try pressing your thumb into soft clay until it looks vaguely feline—and ask yourself afterward: what else could I shape if I stopped overpolishing?
Leave a Reply