When it comes to small kitchen upgrades, most homeowners assume they’ll cost too much or change too little. But here’s the twist: you can make three or four targeted tweaks this week—no demolition required—that will permanently improve how you cook, clean, and move around the room.
Why These Tiny Changes Matter
The modern kitchen has turned into a command center. Between daily cooking, remote work snacks, and family hangouts, we’re demanding more from the same square footage. Materials have evolved too—matte quartz counters now resist stains better; compact LED fixtures use half the power of fluorescents. The point isn’t flash—it’s precision. Each upgrade should earn its keep by saving seconds or reducing friction. A recent thread by Reddit user Aggressive-Earth-973 nailed it: people want features that make life easier, not just trendier.
How Small Kitchen Upgrades Work in Practice
Before you start ordering parts or booking a contractor, map out how each improvement integrates with your existing layout. Don’t chase aesthetics first; chase usability. Here’s a short do-this-then-that checklist to guide you:
- Step 1: Open every drawer and cabinet once. Note where you hesitate or reach awkwardly—those are upgrade zones.
- Step 2: On paper or phone notes app, label each zone (e.g., “sink area,” “stove prep,” “coffee corner”). Add one friction point per zone.
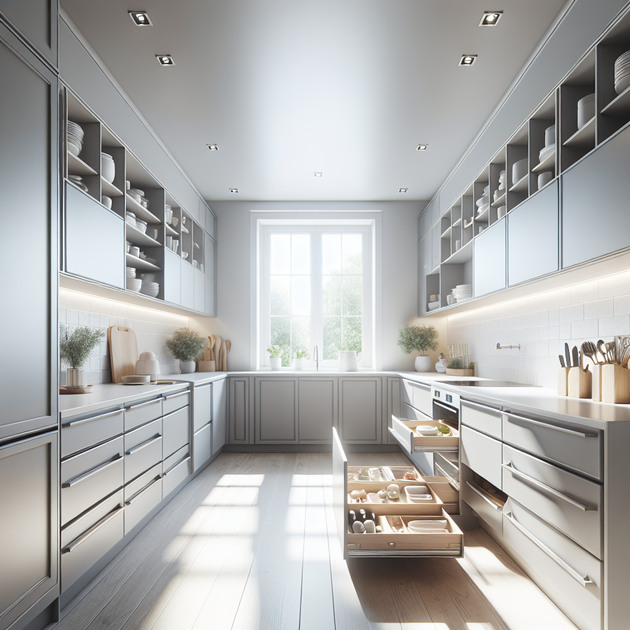
- Step 3: Match one micro-upgrade to each friction point—soft-close hinges for noisy drawers; pull-out trays for deep cabinets; under-cabinet lighting for dim prep spots.
- Step 4: Measure twice before ordering any fixture online. Most mounting brackets vary by millimeters—check specs under “Installation” tab on the product page.
- Step 5: After installing one upgrade, live with it for a week before doing the next. This prevents cascading mistakes (like blocking outlets or overlapping door swings).
A Real-Life Test Run
A friend of mine renovated her 1990s galley kitchen on a modest budget. Instead of replacing everything, she focused on flow. She added full-extension slides to lower cabinets so pots stopped hiding in the back; installed a single magnetic knife strip instead of a bulky block; and swapped an old fluorescent tube for a dimmable LED bar under the cabinets. The result? She cut prep time by minutes every meal—and noticed her energy bill drop slightly after switching lights.
The contrarian insight here is that the most satisfying improvements aren’t always visible in photos—they’re felt at 6 a.m. when you can find the measuring cup without turning on every light.
Nuances and Limitations to Watch For
No upgrade is universally perfect. Soft-close hinges sound great until you discover some models slow down unevenly when exposed to humidity (common near dishwashers). Fix: apply silicone grease or switch to stainless steel dampers rated for “moist zones.” Likewise, motion-sensing under-cabinet lights may misfire if placed near shiny surfaces that bounce infrared signals—test angles before screwing them in.
Another trade-off is countertop outlets versus pop-up towers. Pop-ups look sleek but often require cutting into stone—something you can’t undo easily. If resale value matters more than minimalism, consider standard flush-mount GFCI outlets along the backsplash instead.
Quick Wins You Can Do This Week
You don’t need a contractor to make progress. Tackle these bite-size tasks first—they deliver immediate quality-of-life boosts.
- Add drawer organizers: Use adjustable bamboo or plastic inserts; measure inside width (in inches) before buying.
- Install LED strips: Buy plug-in kits labeled “warm white 2700K–3000K.” Clean surfaces with isopropyl alcohol before sticking tape lights to ensure adhesion.
- Replace faucet aerator: Unscrew tip using pliers wrapped in tape; install low-flow aerator (1.5 GPM) to save water without losing pressure.
- Tune fridge coils: Pull unit forward slightly; vacuum dust from rear coils every six months to maintain cooling efficiency.
- Add hooks under shelves: Use screw-in cup hooks spaced 3 inches apart for mugs or measuring spoons—costs less than $10 total.
The Bigger Picture of Small Kitchen Upgrades
The smart approach is layering practicality over design flair. The temptation during renovations is to pick glossy finishes first and fix workflow later—that’s backwards engineering. Start with how you move through breakfast cleanup or dinner prep; then choose materials that support those motions.
If you rely heavily on appliances like air fryers or stand mixers, dedicate a pull-out shelf on full-extension rails rated above 75 pounds (Consumer Reports offers guidance). For high-use countertops, matte quartz resists glare better than polished granite and hides crumbs—handy if your lighting angles are harsh.
An underrated improvement is adding toe-kick drawers along base cabinets. They use dead space near the floor for baking sheets or placemats without changing cabinet faces—a carpenter can retrofit most bases in half a day using off-the-shelf slides from hardware stores like Home Depot or Lowe’s.
Troubleshooting Common Hiccups
If something feels “off” after an upgrade—door scraping wall edge or drawer front misaligned—don’t panic. Ninety percent of these issues come from skipped calibration steps during installation:
- Cabinet doors uneven? Open door halfway; use Phillips screwdriver on hinge adjustment screw marked “↔” until gap aligns with neighboring door.
- LED strip flickering? Check connector polarity (+/–). Reverse plug orientation before assuming strip failure.
- Poor adhesive grip? Warm surface gently with hair dryer (~30°C) before pressing LED tape again for 15 seconds per inch.
- Noisy drawer runners? Apply dry PTFE spray lubricant instead of oil—it won’t attract dust buildup over time.
The Contrarian Take: Skip Some “Trendy” Add-ons
Certain trendy accessories underperform in real kitchens. For instance, touchless faucets sound hygienic but often false-trigger during cleaning sessions when water splashes sensors. Unless you’re managing high traffic (like shared rentals), stick with single-lever manual models—you’ll spend less time waving at your sink like it owes you money.
Similarly, smart fridges with integrated displays can lock into outdated software ecosystems within two years (Wirecutter tests show mixed longevity results). A better route: mount a cheap tablet magnetically if you need recipes nearby—that way upgrades remain decoupled from appliance lifespans.
Sustainability Without Sacrifice
If eco-efficiency drives your choices, prioritize components that combine durability and energy savings rather than chasing certifications alone. Induction cooktops consume less power than gas models but demand compatible cookware; swapping only if your pans already have magnetic bases saves waste and cost.
You can also install flow-limiting valves on hot-water lines feeding dishwashers—a subtle change that cuts consumption without extending cycle time (U.S. Department of Energy guide). These micro-efficiencies add up across months of daily cooking and cleaning.
The Emotional ROI
The beauty of careful micro-upgrading lies in instant feedback loops. You tighten one hinge screw today and feel smoother motion tonight—it’s engineering gratification scaled down to human speed. Over months, these moments accumulate into calm confidence every time you walk into your workspace.
You might notice family members start participating more too—kids unloading dishwasher because racks glide easier; partner prepping salads because lighting no longer blinds one side of the counter. That’s soft data but meaningful nonetheless: functionality drives participation more reliably than aesthetics ever did.
Your Turn
If you could only tackle two small fixes this weekend—say replacing one fixture and optimizing one storage zone—which would they be? Start there, measure impact after seven days, then decide if another layer makes sense. Renovation doesn’t have to mean chaos; sometimes it’s just five well-chosen screws away from feeling brand new.
Leave a Reply