Ever thought about turning old kitchen gadgets into high-tech tools? A used $10 air fryer from the flea market can become the heart of a smart Arduino filament dryer—making 3D printing even easier and more reliable at home.
Why Use an Air Fryer as a Filament Dryer?
If you’re into 3D printing, you probably know that dry filament is key for high-quality prints. Moisture in your PLA or PETG can cause all sorts of problems—stringing, weak prints, and even failed jobs. Dedicated filament dryers exist, but they’re not exactly cheap or easy to upgrade.
That’s where the humble air fryer comes in. Air fryers are basically compact convection ovens with precise temperature control—almost perfect for drying out spools of 3D printing filament. By adding an Arduino Uno R4 WiFi and some relays to automate everything, you can get better results than many commercial dryers.
How the Arduino Filament Dryer Works
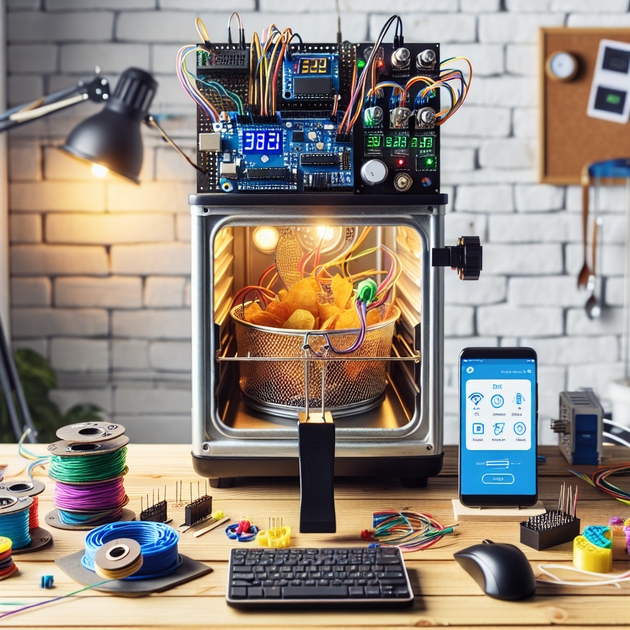
The project starts with that $10 secondhand air fryer. After gutting the controls and wiring in an Arduino Uno R4 WiFi, you can monitor and manage the heating element using a combination of solid-state and mechanical relays (SSR + traditional relay). This lets you precisely control the drying temperature and cycle.
But it gets even cooler—a custom dashboard built with the Arduino Cloud lets you see status and change settings from your PC or phone anywhere on your network. You can monitor temperature, set timers, and make sure your filament is always ready for your next print.
Here’s what makes this build stand out:
- Uses cheap or recycled components (air fryer + Arduino)
- Automated temperature control for safe drying
- WiFi dashboard for remote monitoring via any browser
- Open-source code and files—anyone can build or improve it
- Adaptable for different types of filaments and spool sizes
Key Hardware and Software Choices
To pull off this Arduino filament dryer project, you’ll need a few specific pieces:
- Air Fryer: Any model with enough space for a spool will work
- Arduino Uno R4 WiFi: For controlling relays and connecting to the cloud
- Solid-State Relay (SSR): Handles high-voltage switching safely
- Mechanical Relay: For extra safety or manual override
- Temperature Sensor: Such as a DS18B20 or DHT22
- Arduino Cloud Dashboard: For remote management and logging
The starter code and wiring diagrams are all available in this step-by-step video guide. If you’re comfortable with basic DIY electronics—or just want to learn—it’s all there for you.
Anecdote: From Flea Market Find to Maker Win
Walking through the local flea market last month, there was no way of knowing that dusty air fryer on the corner table would become something way more useful than just another kitchen appliance. After some careful cleaning and swapping out the old controls for an Arduino setup, it was running like new (but way smarter). The dashboard even makes it fun to keep tabs on the process—sometimes it feels like watching over a tiny industrial oven from your phone while making coffee.
How You Can Build Your Own
Building your own DIY filament dryer is easier than you think—and you don’t need any fancy equipment or rare parts. Here’s what you’ll need to get started:
- A secondhand or budget air fryer (check thrift stores or flea markets)
- An Arduino Uno R4 WiFi
- A solid-state relay and mechanical relay
- A waterproof temperature sensor
- Basic tools (screwdriver, wire strippers)
- Your favorite 3D printing filament to test
Full details—including wiring diagrams and code—are linked in this project video guide. The whole thing is open-source so you can tweak it for your own needs.
If you’re curious about moisture in filaments or want more background on why drying matters so much, check out this Filament2Print article—it covers what types of filaments need drying and why.
So—what other gadgets could be repurposed for 3D printing? Ever tried hacking kitchen appliances for your workshop? Let’s hear your wildest upcycle ideas!
Leave a Reply