Did you know you can turn a tiny Raspberry Pi into your very own network storage? That idea hooked me right away. Sure, it’s not the flashiest gadget sitting on my shelf—but this little Raspberry Pi NAS is all mine, built from scratch (well… with some help from templates). If you’re thinking about building your own home server or just want to tinker with electronics, let me walk you through what I learned—and why I’m so proud of this lumpy little box.
Why Build Your Own Raspberry Pi NAS?
Let’s be honest—there are plenty of sleek commercial NAS (Network Attached Storage) devices out there. So why bother with a DIY option? For me, it was equal parts curiosity and challenge. I wanted:
- A flexible way to store family photos and files.
- Something to learn basic electronics and Linux skills.
- A project that wouldn’t take up much space (tiny apartments demand tiny solutions).
- The satisfaction of actually making something useful.
And let’s face it—there’s something cool about having a custom-built gadget chugging away in the background.
How I Built My Compact Home Server
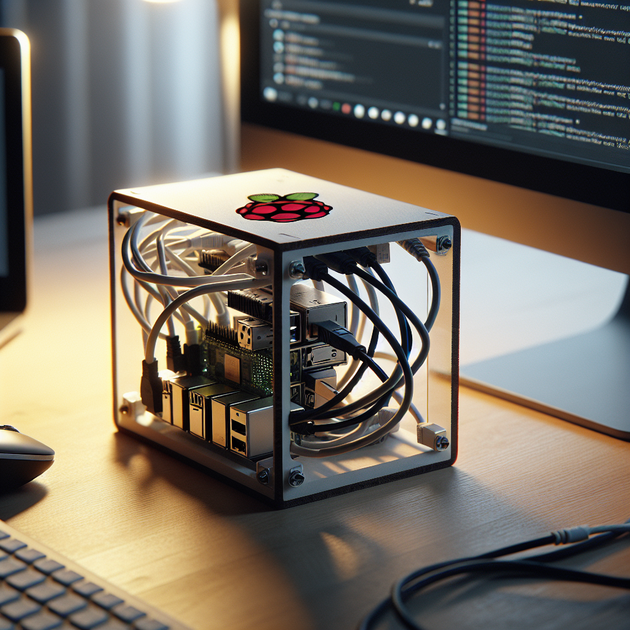
I started with the classic choice for beginners—a Raspberry Pi 4. It’s cheap and easy to find guides for. For the case itself, I grabbed an online template to laser cut the outer shell (no shame in not designing everything from scratch!). But the real fun came when designing the internal mount for the board and drives—I had to figure out airflow, fitting things snugly together, and making sure nothing shorted out.
Here were my main steps:
- Prep: Gathered a Raspberry Pi 4 board, microSD card for the OS (I used OpenMediaVault), external USB drive for storage, power supply, and some basic tools.
- Case Assembly: Used a template for the outside shell but designed my own mount using some leftover acrylic scraps. A bit rough around the edges but functional!
- Wiring: Connected everything up—this is where cable management became “cable chaos.”
- Software: Flashed OpenMediaVault onto the SD card. Configuration was mostly plug-and-play thanks to user forums.
- Testing: Fired it up on my home network—and after a few hiccups (and some panicked Googling), it worked!
The Good (and Not-So-Good) Parts of My DIY NAS
So did my homemade Raspberry Pi NAS change my life? Not exactly—but there were some surprises along the way.
- Tiny Footprint: This thing barely takes up any desk space! It fits right behind my monitor.
- Proudly Imperfect: The case isn’t winning any beauty contests. But honestly? That makes it more “mine.”
- Cable Management Woes: Even with such a small device, keeping cables tidy is tough. Next time I’ll plan better routes for wires before putting everything together.
- Learning Curve: Setting up software like OpenMediaVault had its tricky moments—but forums and YouTube saves lives.
A Quick Anecdote: Debugging Disaster
Here’s where things got real. On day two after setting up my new home server, it suddenly wouldn’t show up on my network. Panic mode! I thought maybe I’d fried something or done permanent damage with bad wiring. Turns out—the SD card had just popped out of its slot when I moved cables around inside the case. One quick push later and everything sprang back to life. Moral of the story? Don’t overlook simple stuff!
If You’re Thinking About Building Your Own Home Server…
A few lessons from my first attempt at building a Raspberry Pi NAS:
- You don’t need fancy design skills—templates plus a bit of creativity go a long way.
- Cable management is worth planning in advance—it makes troubleshooting much easier later.
- The open-source world is full of helpful folks who’ve been where you are now!
- Your first project probably won’t be perfect—and that’s totally fine.
Now that mine is running smoothly (mostly!), I’m already thinking about version two—a neater case and maybe an LED indicator or two.
What would you do differently if you built your own Raspberry Pi NAS? Got any tips for tidier builds or must-have features? Let me know!
Leave a Reply