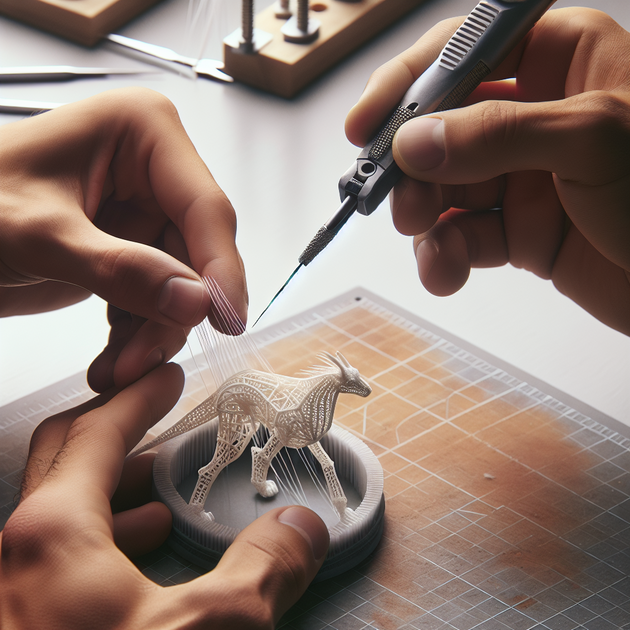
What’s the secret behind those hyper-realistic figurines and models you see in the world of 3D printing? One clever trick is adding real nylon hairs—think whiskers on animal models or bristles on tiny brushes. Designing a simple tool to implant nylon hair into your 3D prints can take your projects from plastic-looking to impressively lifelike. The best part? There’s now an easy-to-use tool that does exactly this—and you can download it free.
Why Implant Nylon Hair in Your 3D Prints?
Adding hair-like fibers isn’t just about looks. Whether you want to create functional brush heads or give a model character with detailed eyebrows or fur, being able to reliably insert strands of nylon opens up a world of creative options. The process is surprisingly straightforward with the right tool and can be done using common materials like inexpensive fishing line or old toothbrushes.
How the Tool Works—and Where to Get It
The implant nylon hair tool (created by my_3d_scan) is designed specifically for anyone working with FDM printers who wants next-level realism or functionality. Here’s what makes it useful:
- Precision: Guides and holds each fiber in place as you push it through the print surface.
- Simple Construction: Small enough for detail work yet sturdy enough for repeated use.
- Easy Integration: Works with most standard FDM-printed parts—no special hardware needed.
- Open Source: Free STL download available at Cults3D.
- Community Tested: Shared on Reddit (see discussion) with tips from real users.
To use it, simply print the tool using standard PLA or PETG filament. Cut your chosen fiber (nylon monofilament works great) to length. Then use the plunger or pusher mechanism on the tool to insert each strand into small pre-made holes in your print.
A Quick Story from the Maker Community
On Reddit’s r/functionalprint, one user shared their first try using this tool on a cat model. Instead of fiddling with tweezers and glue—a method that usually ended in frustration—they managed clean whisker implants in under ten minutes. The result? A model that made everyone do a double-take! It’s a reminder that sometimes small tweaks (and clever tools) make all the difference when finishing your prints.
Tips for Getting Great Results When You Implant Nylon Hair
Success comes down to preparation and patience. Here are some tried-and-true tips:
- Select the right fiber: Thin fishing line (0.2–0.4mm) is flexible but strong. Old toothbrush bristles also work well.
- Create starter holes: Design small pilot holes (just bigger than your fiber diameter) on your model before printing—or carefully poke them afterward with a fine needle.
- Taper ends if needed: Slightly melting one end of each strand with a lighter helps lock it inside the print.
- Add glue sparingly: For permanent fixtures, dab a tiny bit of superglue at the base after insertion.
- Trim after inserting: Wait until all fibers are implanted before snipping them to final length for even results.
The Future of Functional Finishing in 3D Printing
As desktop printers get more accessible and designers share innovative accessories like this one, personalizing and finishing your projects is easier than ever. Whether you’re making miniatures more realistic or prototyping new brush designs, being able to implant nylon hair gives you more control over texture and appearance.
Thanks to open sharing platforms like Cults3D and communities such as Reddit, these solutions are now within reach for anyone with access to a printer—no advanced skills required.
So next time you’re looking at your latest print and thinking something’s missing, will you try adding some real-life detail with this handy little tool?
Leave a Reply