What happens when you mix the creativity of DIY electronics with the latest in single-board computers? You get something as cool—and functional—as a homemade Cyberdeck. The concept of the Cyberdeck has exploded among makers lately, but building your own is still an adventure full of choices (and challenges). Here’s how my first attempt turned out—and what I learned along the way.
What Makes This Cyberdeck Unique?
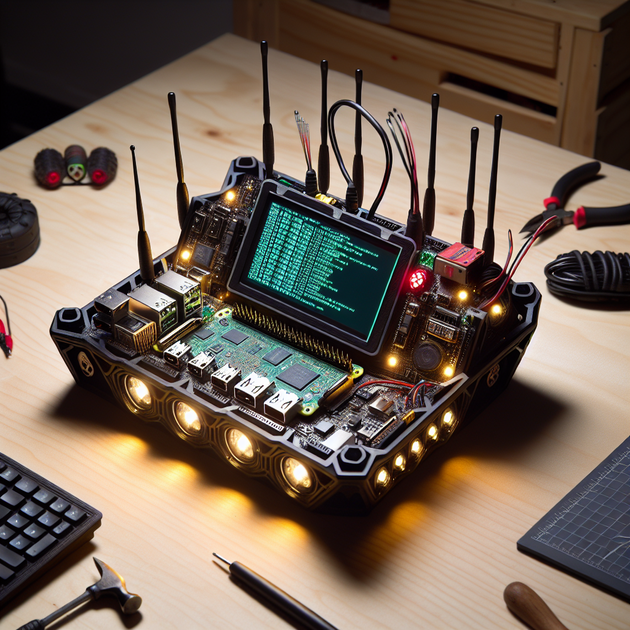
The heart of this project is a Raspberry Pi 5 with 8GB RAM and 128GB storage. That already gives it plenty of muscle for most portable computing needs. But what really sets this build apart is its blend of connectivity options—perfect if you want to take your portable workstation on the road (or off-grid).
- Cellular Power: A Quectel RM530N-GL industrial-grade modem brings LTE, full 5G—including mmWave—and serious mobile data speed.
- GPS Module: The Neo-6M allows for real-time location tracking and opens up creative possibilities for mapping or location-based apps.
- WiFi Flexibility: Dual-band WiFi antennas let you connect to one network while creating an access point on another—handy for pen-testing or sharing connections.
- Touchscreen Display: The build uses a crisp seven-inch touch display that makes interacting with the system much more intuitive than squinting at a tiny screen.
- Custom Case: Everything is housed in a self-designed, 3D-printed enclosure tailored to fit all these components snugly but still be easy to carry.
The Specs Under the Hood
If you’re curious about the technical side of this Cyberdeck, here’s what’s inside:
- Mainboard: Raspberry Pi 5 (8GB RAM)
- Storage: 128GB
- Connectivity:
- Quectel RM530N-GL (LTE/5G/5G mmWave)
- Neo-6M GPS module
- Dual-band WiFi antenna
- Display: 7-inch touchscreen panel
- Batteries: Three lithium cells totaling around 10,000mAh (about two hours at full load)
- Total Power Draw: Up to 25 watts (expect some thermal throttling under heavy use!)
- Enclosure: Custom-designed and 3D printed case
A Few Lessons (and Laughs) from Building My First Cyberdeck
No matter how well you plan things out on paper—or in your head—projects like this always come with surprises. For me, cooling was one of them! The Raspberry Pi gets pretty warm under load (especially when using all those wireless modules), so if you’re planning your own build, don’t skimp on airflow or heat sinks. Also, while three big batteries sound like overkill at first glance, they’re worth it if you want decent run time away from an outlet.
I remember spending an afternoon wrestling with the best place to mount antennas without blocking ports or making the deck too bulky. In the end? Function won over form! The deck isn’t exactly thin—but it’s robust and fits nicely in a backpack.
Troubleshooting & Ideas for Next Time
- If you need longer battery life without bulk, consider using higher-density cells or optimizing software to reduce power draw.
- A proper cooling solution could unlock even more performance from the Pi—think fans or aluminum heat spreaders built into the case design.
- A slimmer design is possible but might require sacrificing some modularity or port access.
- If you want this as a daily driver for outdoor projects or travel hacking—don’t overlook ruggedization like dust covers or weather sealing!
This project taught me that perfection isn’t necessary; function matters more than looks sometimes. If people are interested in trying their hand at their own custom decks—or just want inspiration for creative tech builds—I’d say start simple and iterate as you go.
An Invitation to Fellow Makers
The best part about creating your own tech gear? There are no strict rules—just guidelines and plenty of room for personal tweaks. If you’ve built something similar (or have ideas to make mine better), I’d genuinely love to hear your thoughts and suggestions!
If you were designing your ideal Cyberdeck from scratch, what would be your must-have feature?
Leave a Reply